


Whether you’re riding solo or cruising in a group, communication on the road is vital to keeping everyone safe and informed. While modern technology offers intercom systems and mobile devices, nothing beats the reliability and simplicity of traditional motorcycle hand signals.
These hand gestures are universally recognized, require no equipment, and can be used in any riding condition—especially when voice communication isn’t an option. Let’s break down the most important hand signals every motorcyclist should know and use.
🏍️ Why Motorcycle Hand Signals Matter
Motorcyclists face unique challenges compared to drivers of cars and trucks. Limited visibility, road hazards, and unpredictable traffic mean riders need to communicate clearly and instantly. Hand signals help you:
- Alert fellow riders to changes in direction or speed
- Warn about hazards ahead
- Coordinate group riding safely
- Maintain situational awareness without relying on electronics
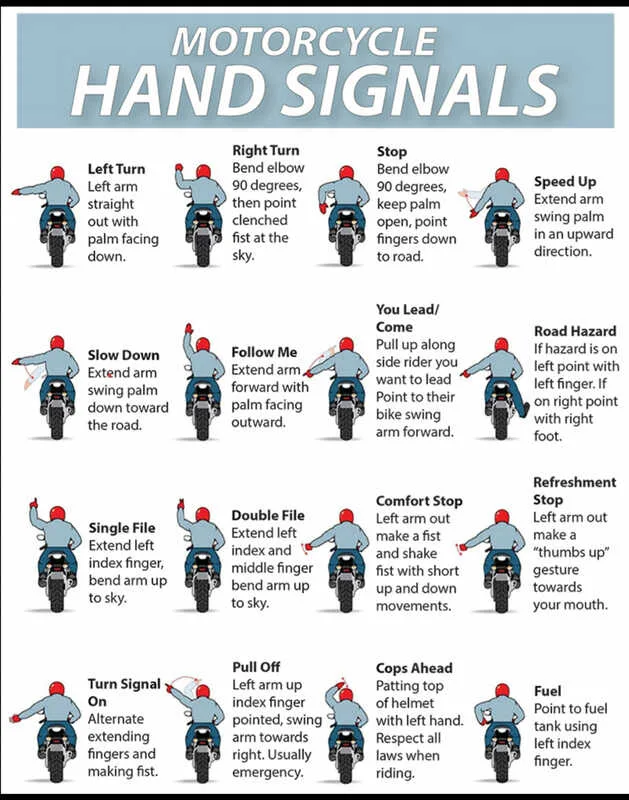
🤚 The Essential Motorcycle Hand Signals
Here are the must-know signals, most of which are performed with the left hand to keep the throttle hand on the bars:
1. Left Turn
How to Do It: Extend your left arm straight out, parallel to the ground.
When to Use It: Signaling a turn or lane change to the left.
2. Right Turn
How to Do It: Raise your left arm, bent at the elbow, with your hand pointing straight up.
When to Use It: Signaling a turn or lane change to the right. (Note: Some riders also extend their right arm straight out, though this is less common in group riding.)
3. Stop
How to Do It: Extend your left arm straight down, with your palm open and fingers pointing to the ground.
When to Use It: Signaling a full stop or heavy braking.
4. Slow Down
How to Do It: Extend your left arm out with palm down, then move your hand up and down.
When to Use It: Alerting riders behind you to reduce speed or prepare to slow.
5. Hazard in the Road
How to Do It: Point directly at the hazard with either hand (left for left-side hazard, right for right-side hazard).
When to Use It: Communicating potholes, debris, or other obstacles in the road.
6. Single File Formation
How to Do It: Raise your left index finger straight up.
When to Use It: Signaling the group to ride in single-file, often for narrow or curvy roads.
7. Double File Formation
How to Do It: Raise your left arm with your index and middle fingers extended (like a peace sign).
When to Use It: Indicating a staggered or two-column group formation is safe to resume.
8. Fuel Stop Needed
How to Do It: Point to your fuel tank with your left index finger.
When to Use It: Letting the group know you’re running low and need to stop soon.
9. Comfort/Rest Stop
How to Do It: Tap your hand on your helmet.
When to Use It: Suggesting a break for stretching, hydration, or rest.
🧠 Tips for Effective Hand Signal Use
- Be Visible: Make sure your hand gestures are clear and deliberate.
- Use Early: Signal well in advance to give your group time to react.
- Repeat as Needed: In group rides, each rider should relay the signal to the person behind them.
- Practice: New riders should rehearse hand signals during local rides until they become second nature.
🏁 Conclusion: Speak the Silent Language of the Road
Motorcycle hand signals are more than just gestures—they’re a form of silent speech that keeps riders safe and connected. Whether you’re part of a tight-knit club or just riding with a buddy, using these signals can prevent confusion, reduce risk, and promote smooth riding.
So next time you head out, throw up that signal with confidence. It’s not just good riding—it’s smart riding.